Step-by-Step Guide for theHarvester Tool
What is TheHarvester?
TheHarvester is a powerful and widely used OSINT (Open Source Intelligence) tool that helps Ethical Hackers, Penetration Testers, and cybersecurity professionals collect information related to target domains and organizations from various search engines, databases, and other publicly available services. The primary function of theHarvester is to gather critical information about a target domain, such as:
- Subdomains: Alternative domain addresses linked to the target.
- Emails: Employee or organizational email addresses. One of the most valuable pieces of information you can collect during a reconnaissance phase is a list of email addresses. These emails can later be used for social engineering attacks or identifying potential weak points in security configurations.
- IP Addresses: TheHarvester can map domain names to associated IP addresses. These addresses can be used for further network scanning and vulnerability analysis.
- Hostnames: Additional domain names or services linked to the target.
This information is primarily used during the reconnaissance phase of penetration testing or when conducting security assessments. It gathers information without directly interacting with the target system, minimizing detection.
Step-by-Step Guide to Using TheHarvester
Step 1: Installing TheHarvester
The first step is to install theHarvester tool on your system. It is commonly available on Kali Linux, but you can also install it manually on other Linux distributions or even on Windows.
- Kali Linux: TheHarvester comes pre-installed on most penetration testing distributions like Kali Linux.
You can verify the installation by using:
| theHarvester -h |
Or
If you wish to update to the latest version or need to install it, you can use the following commands:
| sudo apt update //used for kali sudo apt install theHarvester //used to install theHarvester in kali |
These commands ensure that theHarvester is installed and up-to-date on your Kali Linux system.
2. Installing on Other Linux Distributions: If you are using a non-Kali Linux OS, you can clone the official repository from GitHub and install it manually:
Command
| git clone https://github.com/laramies/theHarvester.git cd theHarvester sudo pip3 install -r requirements.txt |
Once installed, you can check whether it’s running properly by executing:
Command
| theHarvester -h |
This will display the help menu showing the available options and arguments.
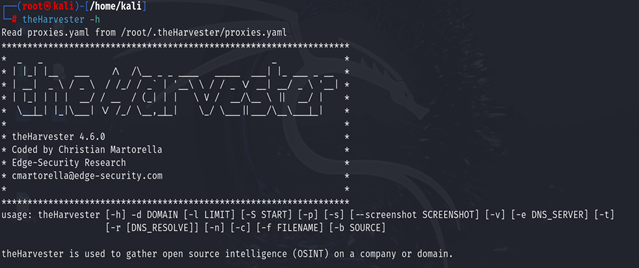
Step 2: Understanding the Syntax and Basic Options
theHarvester tool has a wide range of options that you can use to tailor your search. Let’s explore some common syntax and options:
Basic Command :
| theHarvester -d -b |
Common options:
Here’s a breakdown of the most commonly used options in TheHarvester:
- -d <domain>: Specifies the domain to search.
- -b <source>: Defines the data source (e.g., yahoo, bing, shodan). You can specify multiple sources separated by commas.
- -l <limit>: Limit the number of results fetched from the data sources.
- -f <filename>: Save the output into a file (in HTML format).
- -n: Perform DNS enumeration using search results.
- -t: Perform DNS TLD expansion.
- -s <start>: Start with a specific result number (useful when you want to skip initial results).
- -v: Enable verbose mode for more detailed output.
Basic Usage Example: To search for a subdomain (e.g., infosectrain.com) using Yahoo as the search engine:
Command
| theHarvester -d infosectrain.com -b yahoo |
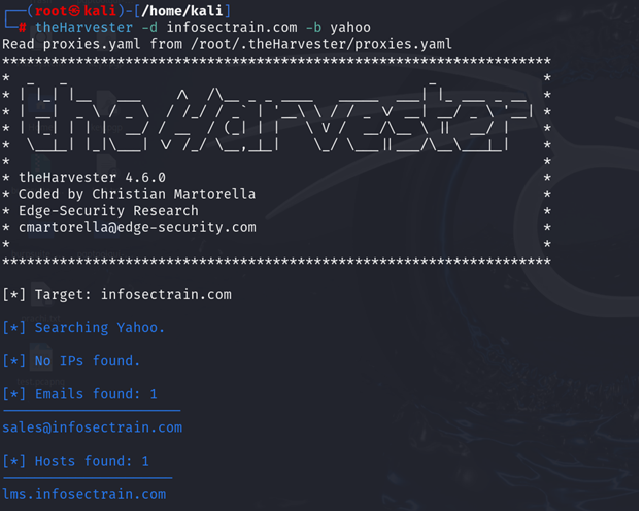
This command gathers subdomain data using Yahoo and displays the results.
For Comprehensive Search: To gather information from all sources, use:
Command
| theHarvester -d infosectrain.com -b all |
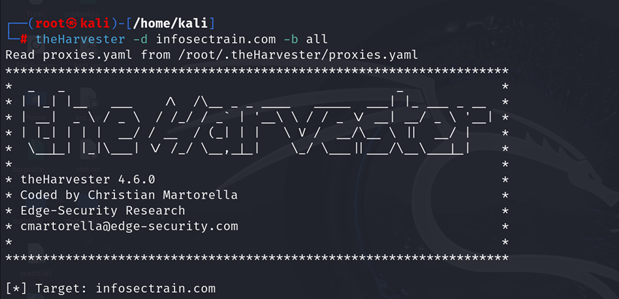
What it does: This command collects information about the specified domain (infosectrain.com) from all supported search engines and data sources.
Step 3: Dig Deeper with Verbose Mode
For deeper analysis, you can use the -v (verbose mode) to obtain more detailed output and combine multiple data sources:
Command
| theHarvester -d infosectrain.com -b yahoo,bing -l 100 -v |
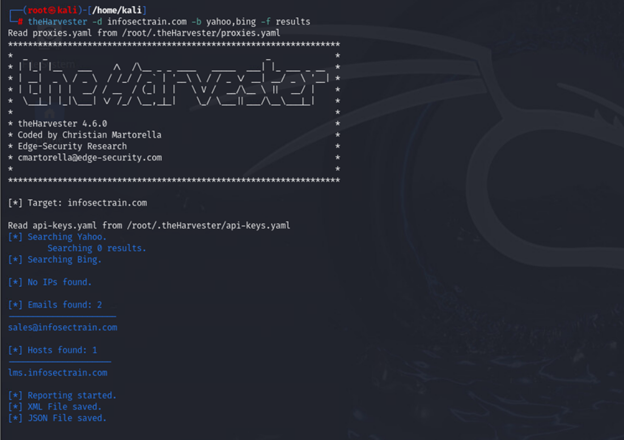
What it does: This command searches for data using multiple sources and provides a more comprehensive result.
Step 4: Saving Results to a File
You can save your results for future reference by using the -f option followed by the filename.
For example:
Command
| theharvester -d example.com -b yahoo,bing -f results |

What it does: This command outputs the results of the scan to files called results.xml and results.json. You can use this file for later analysis or report generation.
Step 5: Additional Useful Queries
Using APIs for Better Results
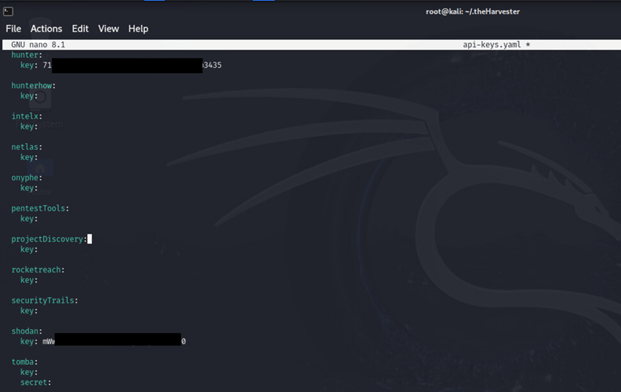
If you have API keys for certain services, such as Hunter.io, you can improve your results by including them in the query.
- Configure the API keys
Before using API-based services, you need to configure the keys in ~/.theHarvester/api-keys.yaml
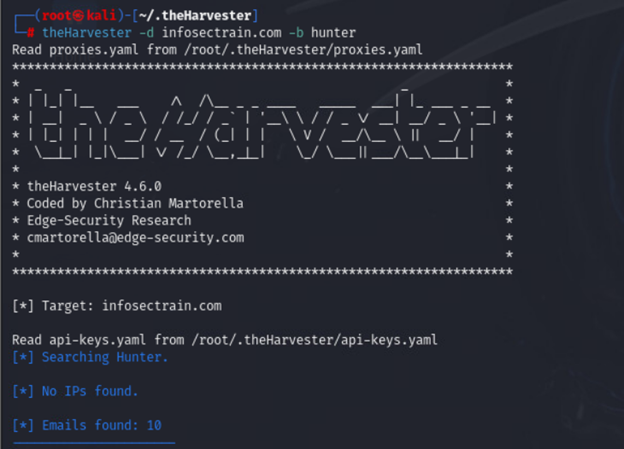
- Using Hunter.io to gather emails
| theharvester -d example.com -b hunter |
Hunter.io is an excellent source for gathering professional email addresses tied to the domain.
Step 6: Analyzing the Output
After running TheHarvester, you will get a list of results that might look something like this:
//Emails found
For Example
john.doe@example.com
jane.smith@example.com
CEH v13 AI with InfosecTrain
TheHarvester is a highly effective OSINT tool that allows you to gather critical information about a target domain. Mastering theHarvester is essential for anyone looking to improve their reconnaissance skills in ethical hacking and penetration testing.
Enroll in InfosecTrain’s CEH v13 AI certification training course to gain hands-on experience with tools like theHarvester. This course helps you master ethical hacking techniques, including open-source intelligence gathering and advanced penetration testing methods. Get trained to identify and mitigate vulnerabilities in real-world scenarios!
TRAINING CALENDAR of Upcoming Batches For CEH v13
| Start Date | End Date | Start - End Time | Batch Type | Training Mode | Batch Status | |
|---|---|---|---|---|---|---|
| 11-May-2025 | 28-Jun-2025 | 09:00 - 13:00 IST | Weekend | Online | [ Close ] | |
| 31-May-2025 | 06-Jul-2025 | 19:00 - 23:00 IST | Weekend | Online | [ Open ] | |
| 07-Jun-2025 | 13-Jul-2025 | 09:00 - 13:00 IST | Weekend | Online | [ Open ] | |
| 21-Jun-2025 | 27-Jul-2025 | 19:00 - 23:00 IST | Weekend | Online | [ Open ] | |
| 06-Jul-2025 | 16-Aug-2025 | 09:00 - 23:00 IST | Weekend | Online | [ Open ] |


 1800-843-7890 (India)